

Switching From Wordpress Com To Wordpress Org
Aug 13, 2021
Astari S.
8min Read
Moving From WordPress.com to WordPress.org: A Comprehensive Guide
As your site keeps growing, moving from WordPress.com to WordPress.org will provide a higher degree of control, customization options, and features.
In this step-by-step guide, we'll go over everything you need to know about moving your site from WordPress.com to WordPress.org. We'll list all the essential plugins to install and share some tips and tricks for a smoother transition.
By the end of this guide, you'll know how to move your WordPress.com blog to WordPress.org, the benefits of doing so, and any common mistakes you should avoid.
WordPress.com is a freemium blogging service that makes it easy for anyone to set up a website using WordPress software. Since all of its plans include a free domain and website hosting, you won't need to search for a separate hosting company or domain registrar.
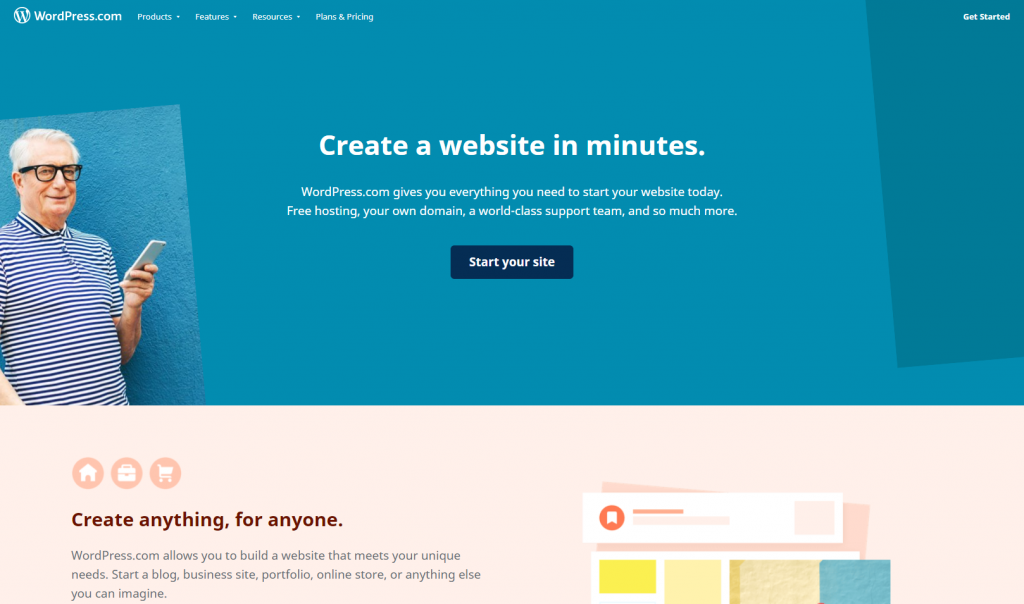
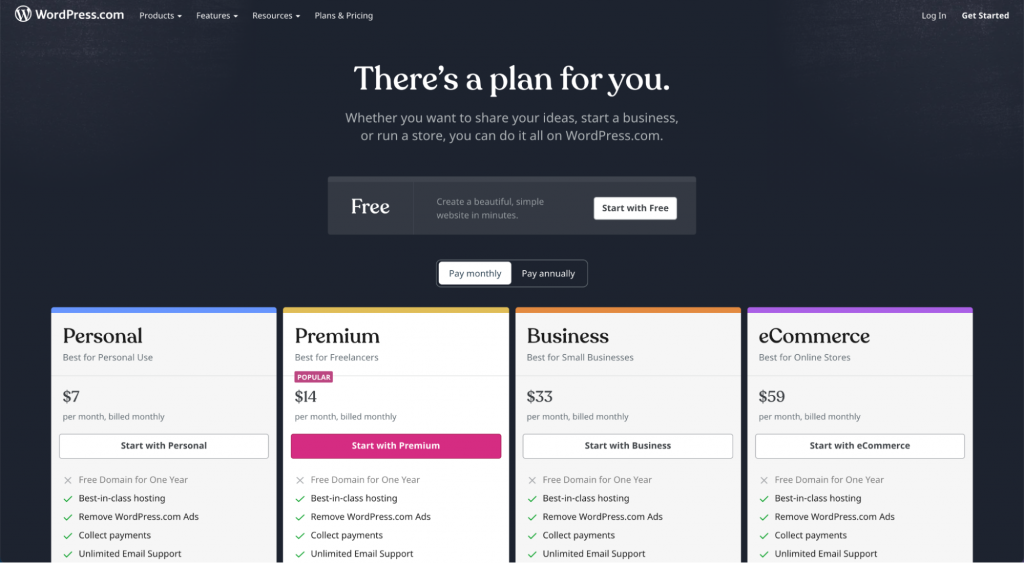
WordPress.com provides all the necessary tools for creating a blog completely free of charge. However, the ability to install plugins and gain access to some of the more advanced features only comes with premium plans.
Every WordPress.com premium plan offers a free domain for one year, removes all WordPress ads, and includes email support.
WordPress.org, on the other hand, is a free, open-source content management system (CMS).
This self-hosted WordPress version requires users to register a domain name and purchase a plan with a hosting provider. You'll need to install WordPress on your website as well. To make the process easier, most hosting providers offer a single-click WordPress installation feature.
WordPress.org offers a much wider variety of plugins and themes than WordPress.com, which provide a larger selection of customization options and helpful features.
Those with more experience in web development will also have more freedom to alter their site code than with WordPress.com.
Overall, WordPress.com provides more assistance when building a website, while WordPress.org grants a greater degree of ownership over it. If you want to get into more detail, read our guide on WordPress.org vs WordPress.com.
Before going over the migration process, we'll list all the necessary steps needed before moving from WordPress.com to WordPress.org.
What Do You Need to Get Started?
In order to set up a self-hosted WordPress site, you'll need to purchase a domain name and a web hosting service plan.
Some web hosting providers offer both of these services as a single package. For example, Hostinger's WordPress Starter plan comes with free domain registration and costs $2.99/month.
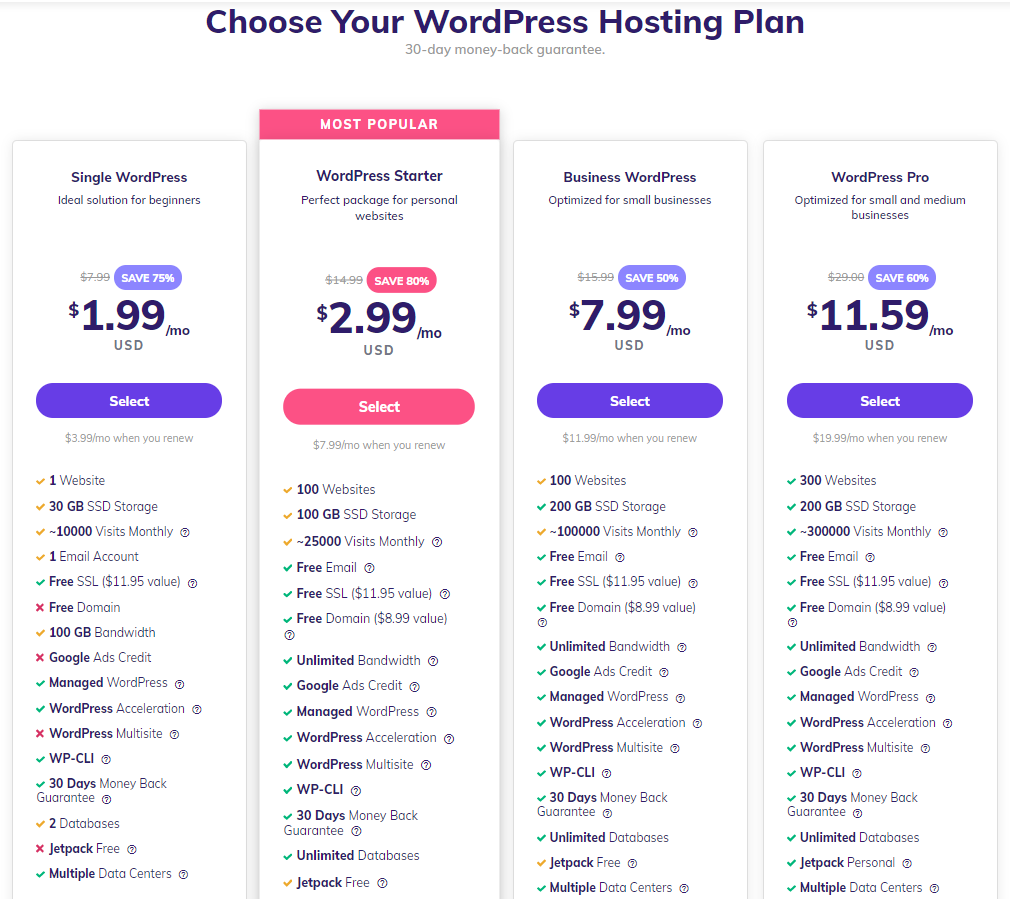
Purchasing a domain name is crucial if you haven't bought it beforehand. However, if you already have a custom domain name and just want a more affordable plan, the Single WordPress plan costs $1.99/month.
If you purchased a domain name from WordPress.com, you would need to point that domain to your web host of choice. We offer two simple ways to point a domain name to Hostinger – changing the nameservers in the domain name registrar or via an A record.
Other services to consider when choosing a web hosting provider are security features and website speed.
For example, all of Hostinger's servers come with additional security layers to monitor and protect your WordPress site. They also utilize LiteSpeed WebServer optimization in order to achieve the best results when it comes to website speed.
Make sure you have access to your old WordPress.com site. Once everything is set up, we're ready for the migration process.
This section will go over a step-by-step guide of the migration process from WordPress.com to WordPress.org.
1. Export Content from WordPress.com Site
To export your content, you will need to log in to your WordPress.com site. Then, head to Dashboard -> Tools -> Export.
Here you will find two options to export your content in the form of website files – either to Export all or Select specific content to export.
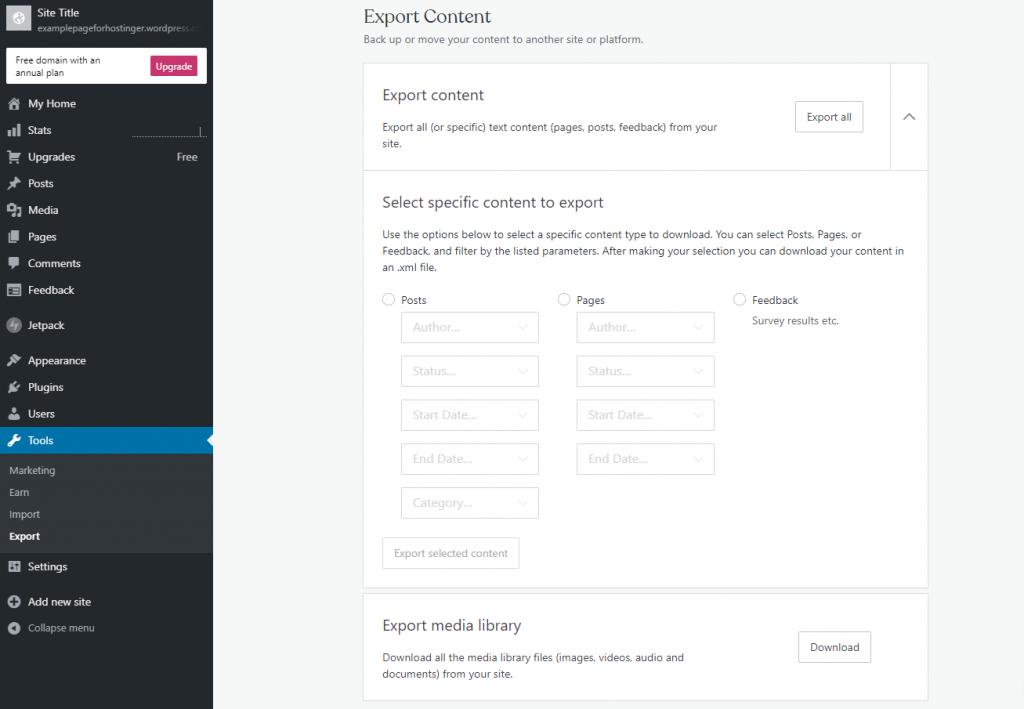
If you only need to export specific WordPress posts or pages, choose the Export selected content option. In this case, you will need to export each section separately and choose the Author, Status, Start Date, and End Date for posts and pages.
However, we suggest the Export all option to avoid missing any content.
The exported file will come in the form of a ZIP file which you'll need to extract.
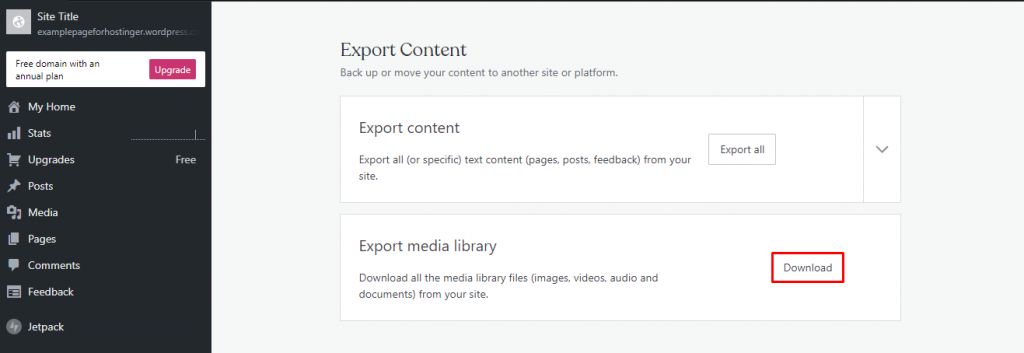
The Export Content option is only for pages, posts, and feedback from the WordPress.com site. If there are images, videos, audio, and documents that aren't on pages or posts, click on the Download button under the Export media library section.
2. Set Up a New WordPress.org Website
A control panel makes it easier for users to manage domain names, install applications, and upload website files.
However, the WordPress installation process from one web host to another is somewhat different. In this guide, we'll learn how to set up a new WordPress.org website using either hPanel or cPanel.
hPanel
Hostinger's hPanel offers a straightforward layout for managing your hosting account.
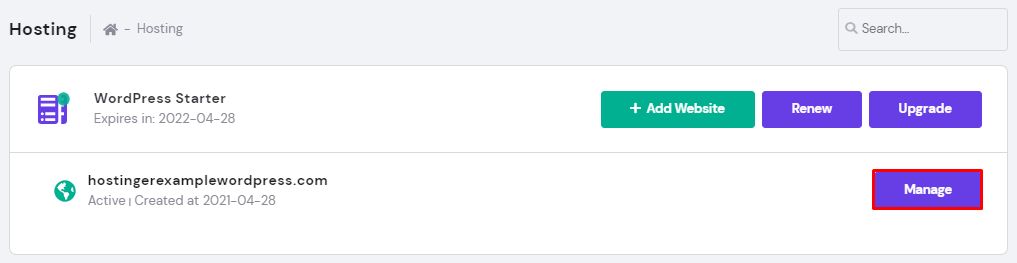
- To access the hPanel from your web hosting account, head to Hosting and click Manage next to the domain name.
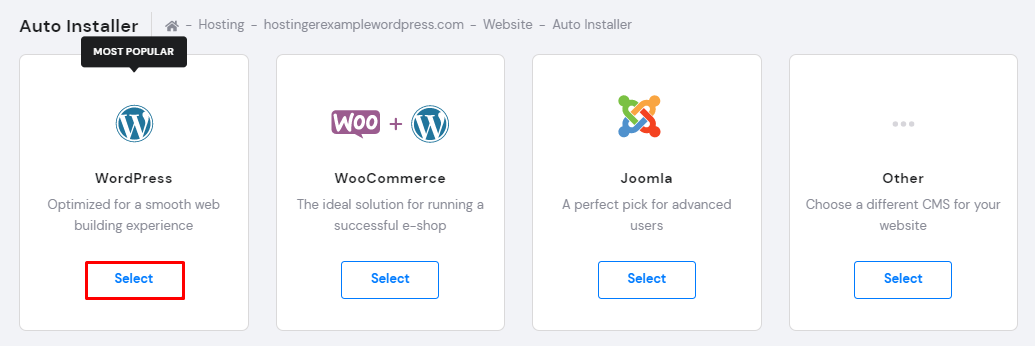
- First, you'll need to install WordPress itself. Under the Website section, click on Auto Installer.
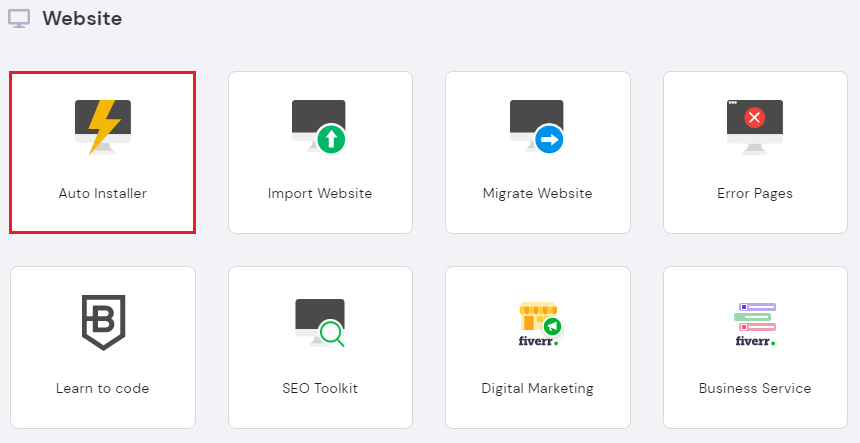
- Select the WordPress option to continue.
Now, we will need to fill out the Install WordPress form:
- Check the custom domain name and make sure it says wordpress in the section next to it.
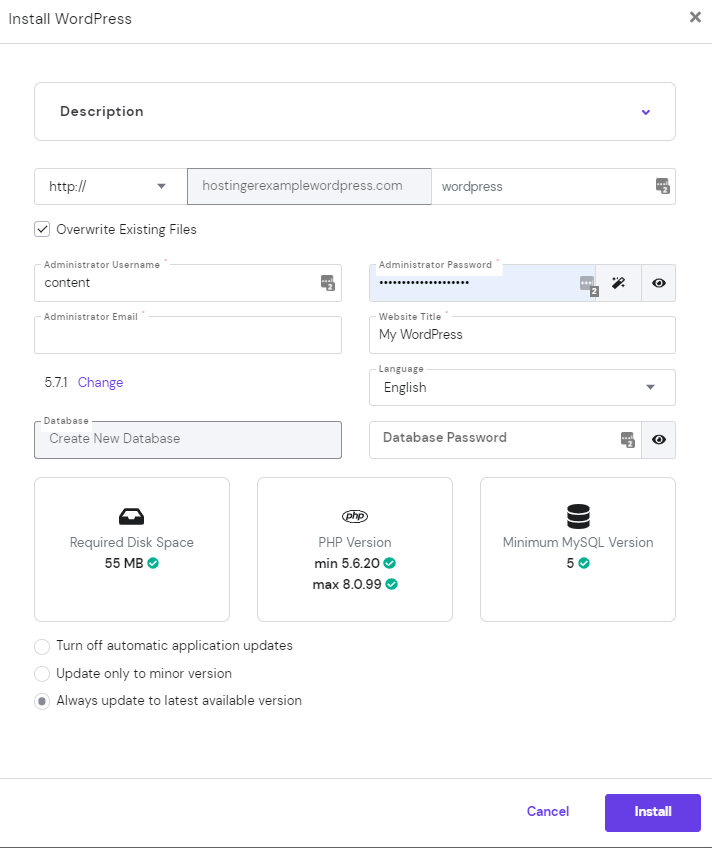
- Fill out your Administrator Username, Password, and Email. They don't need to be the same as your web hosting login information.
- Pick your WordPress Website Title.
- Choose your preferred Language.
- Make sure that the Always update to latest available version option is selected.
- Finally, hit Install.
- After installing WordPress, click on the three dots icon next to your domain name, and choose Manage.
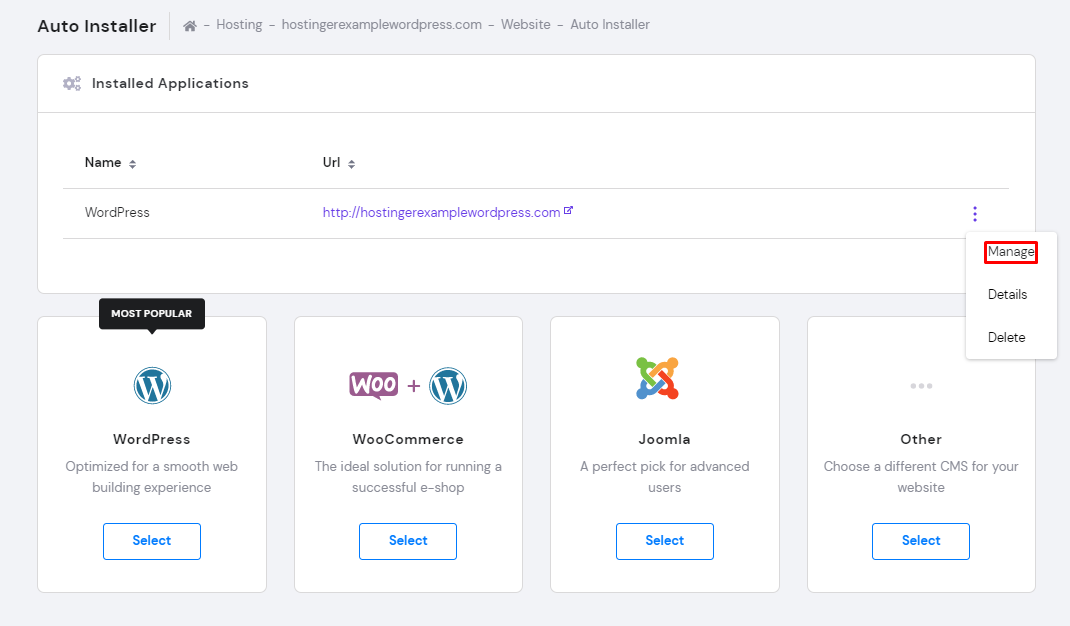
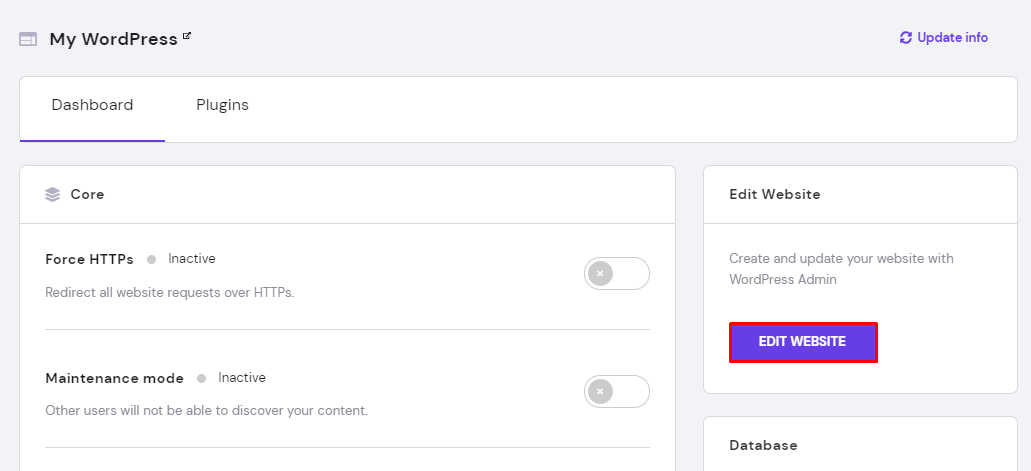
- It will direct you to another page. From there, click on the Edit Website button, which will lead you to the WordPress Dashboard.
- After installing WordPress, there will be a separate WordPress section at the top of hPanel for easier access to the previous window.
- To keep the same layout as the old WordPress.com site, you need to change your WordPress theme before importing.
- Head to Dashboard -> Appearance -> Themes and choose the same theme as the WordPress.com site in the official directory, if available.
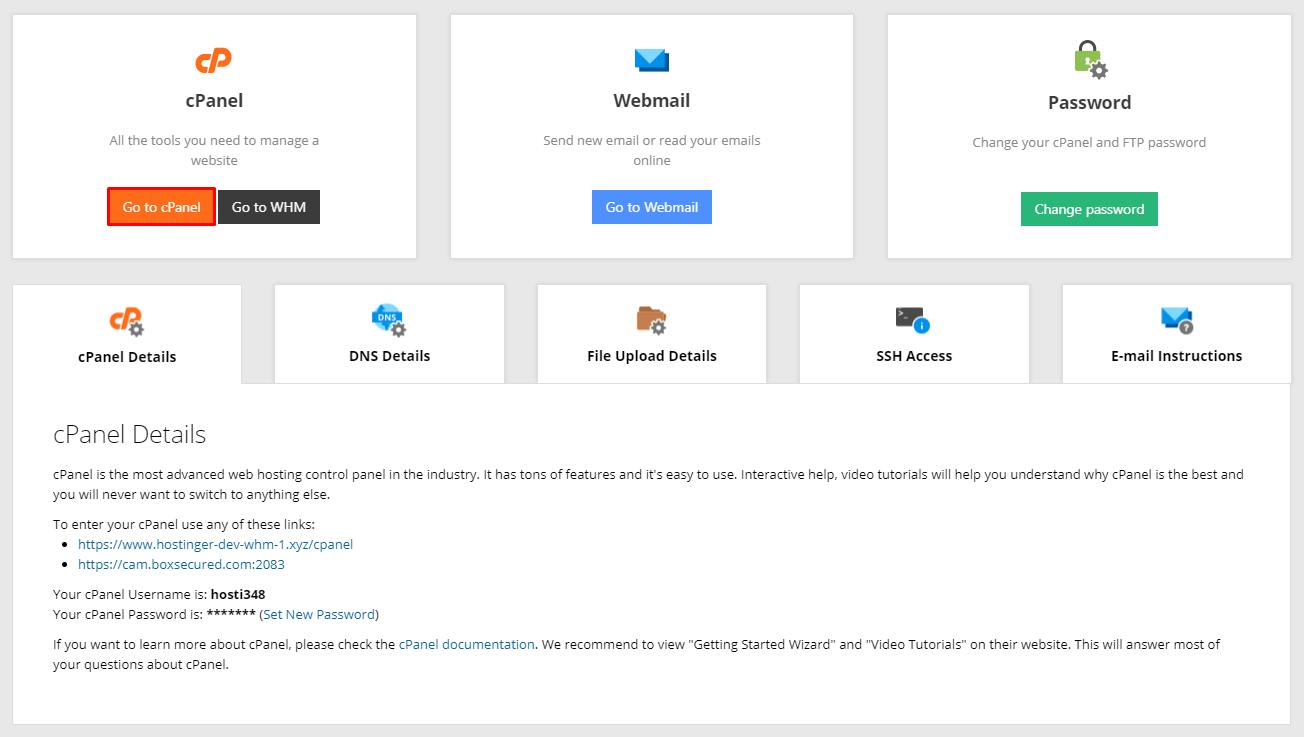
cPanel
As one of the most popular control panel options, cPanel offers both a graphical interface and server management interface via WHM (Web Host Manager). The initial process to get to the cPanel is similar to that of hPanel.
- Once you're logged in to your web hosting account, click on Hosting -> Manage -> Go to cPanel to access the cPanel.
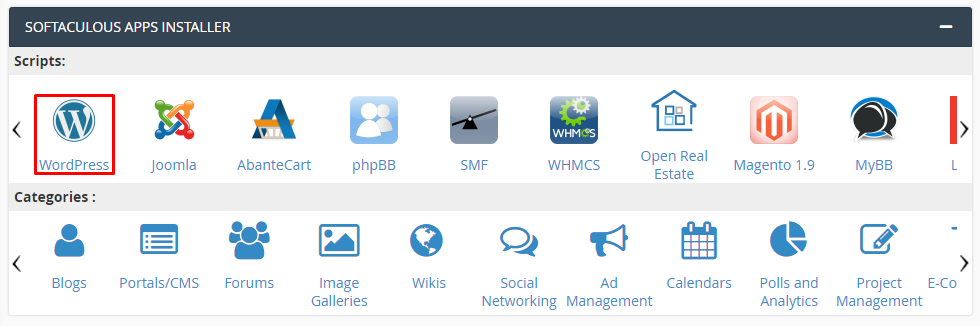
- Head to Softaculous Apps Installer and click WordPress.
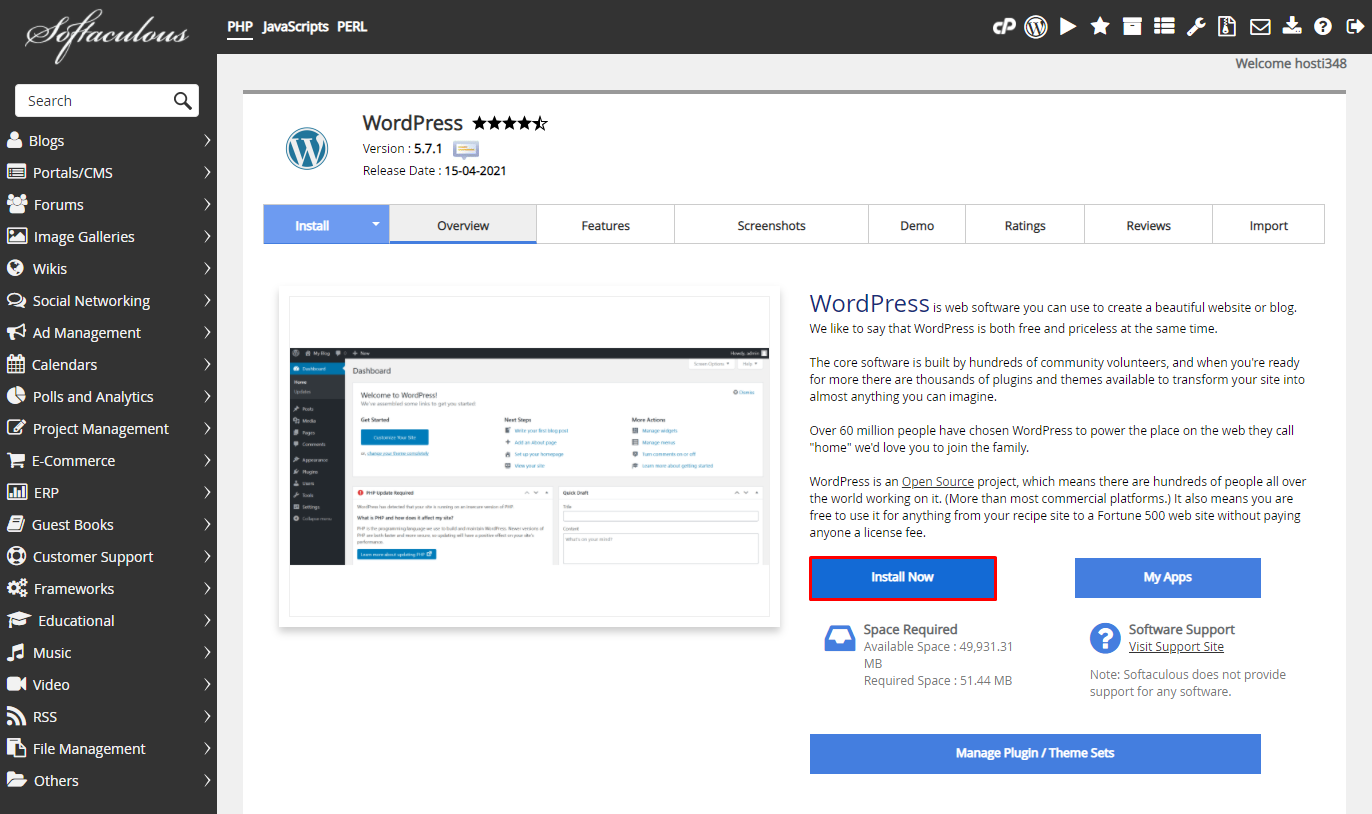
- From there, click the Install Now button.
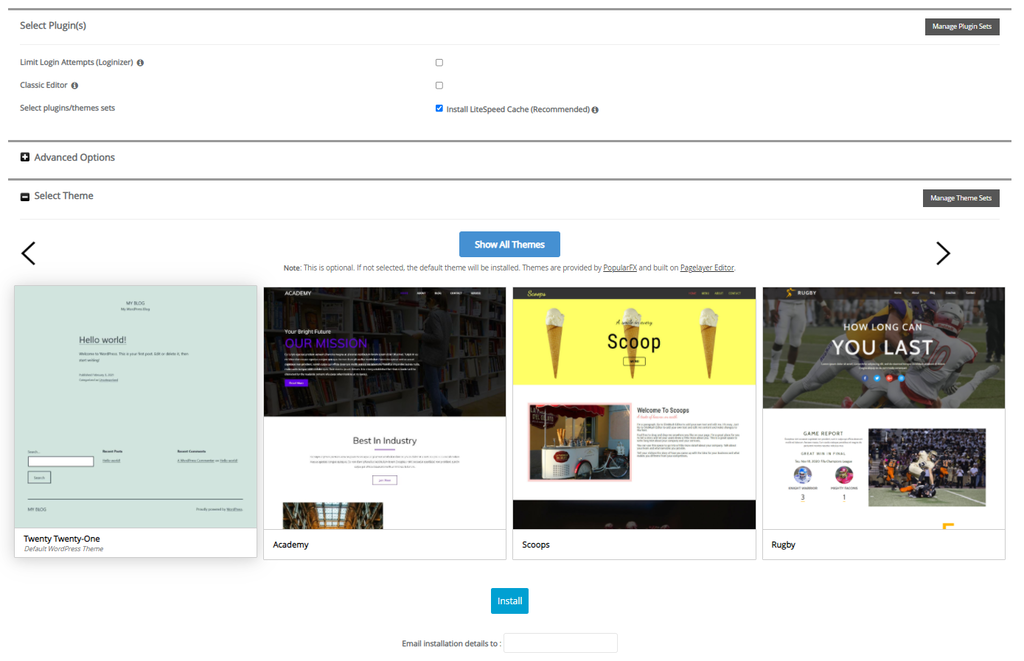
- Make sure to fill in your Site Name, Site Description, Admin Username, Password, and Email. Finally, choose your preferred Language.
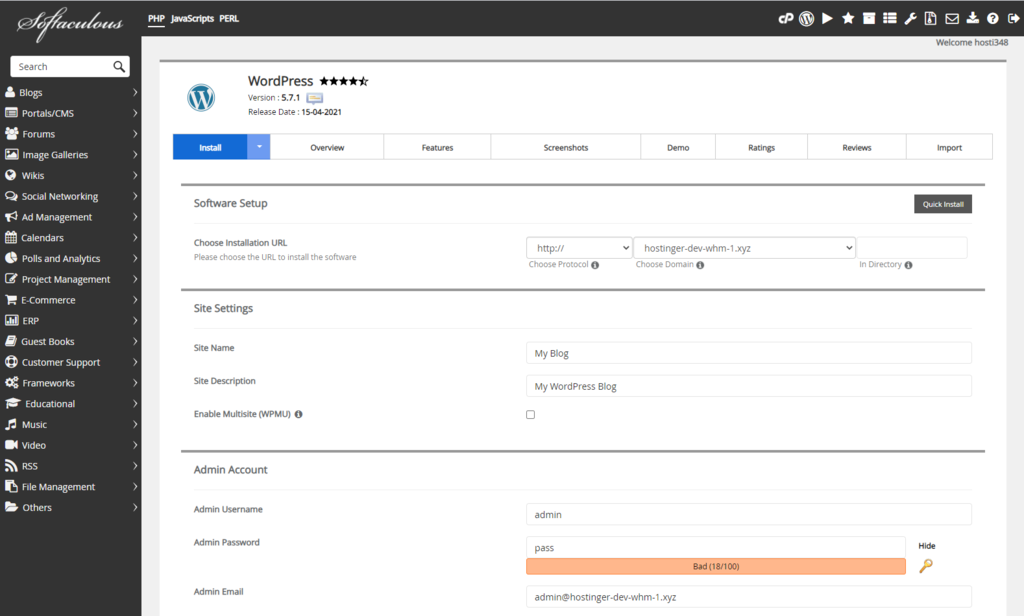
- In addition, there's also a Select Plugin(s) option, which includes Limit Login Attempts, Classic Editor, and Install LiteSpeed Cache plugins.
- Then, select the initial theme you would like to use. You might want to choose the same WordPress theme as the previous site, if available. Click on Show All Themes to search for it in the directory.
- To get all of the installation details, fill out the Email installation details to field. Once you finish filling out the form, click Install.
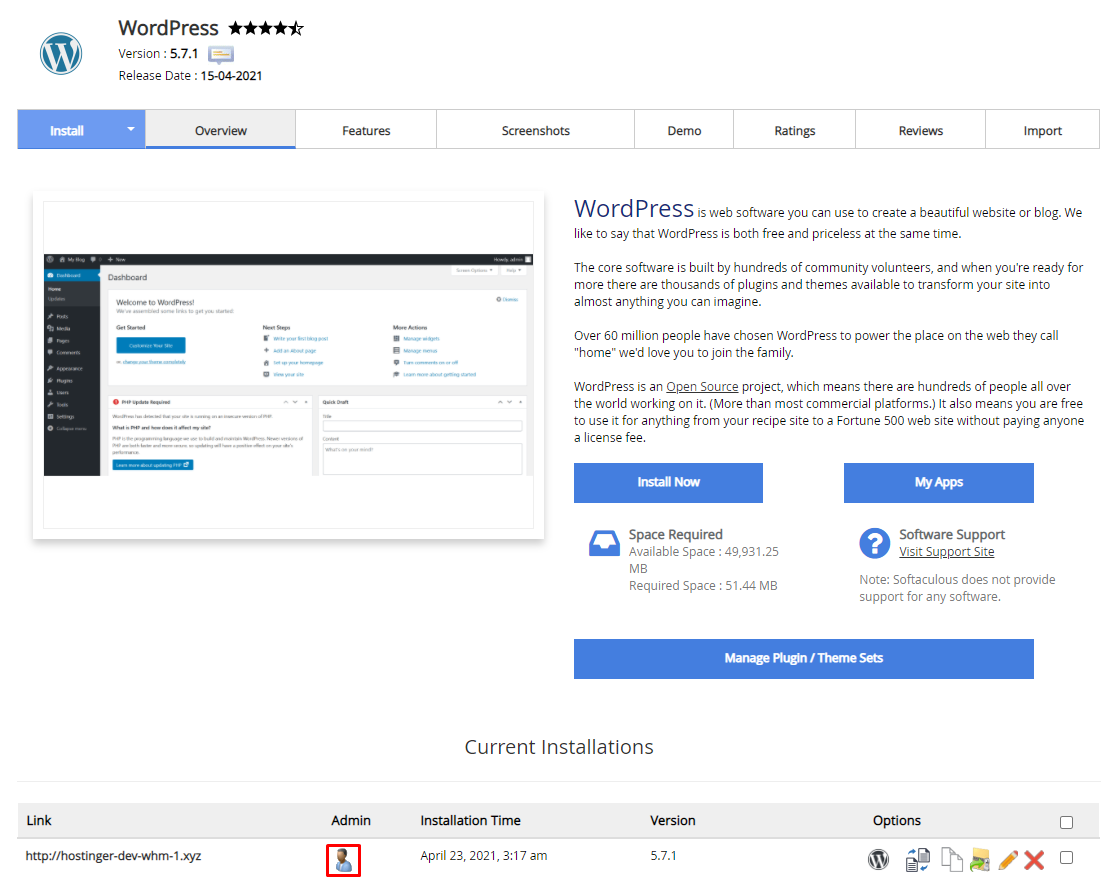
- Then, click on the WP Admin icon to get directed to the self-hosted WordPress dashboard.
3. Import Content to the New WordPress.org Website
To import your content, prepare the exported XML file from the previous section.
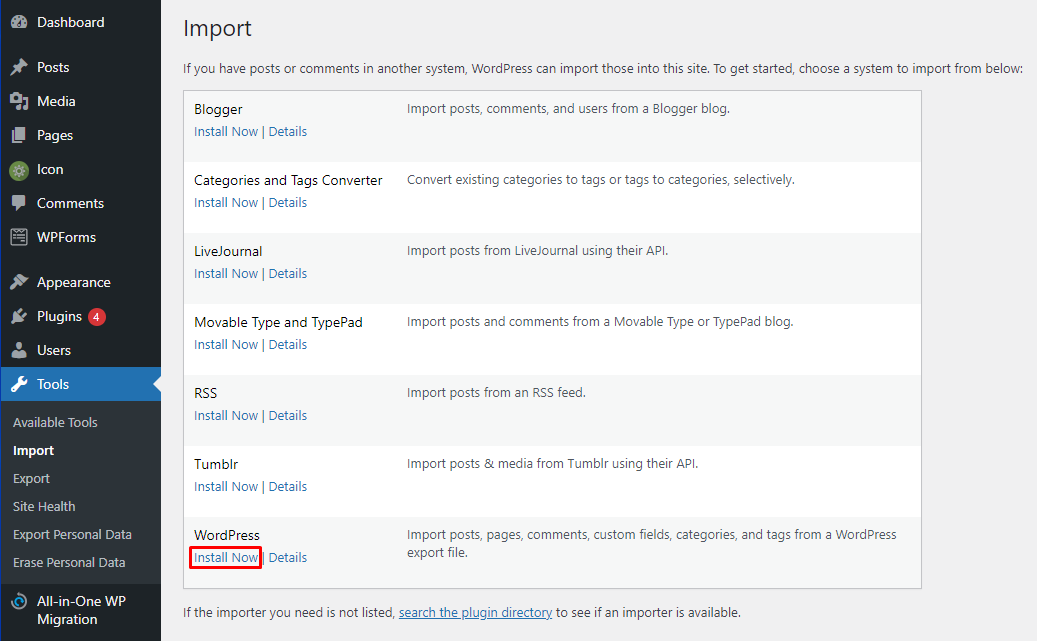
- To start the import process, head to Dashboard -> Tools -> Import. Here you will find different tools available.
- The first step is to install the WordPress importer plugin. Simply click the Install Now button under the WordPress section.
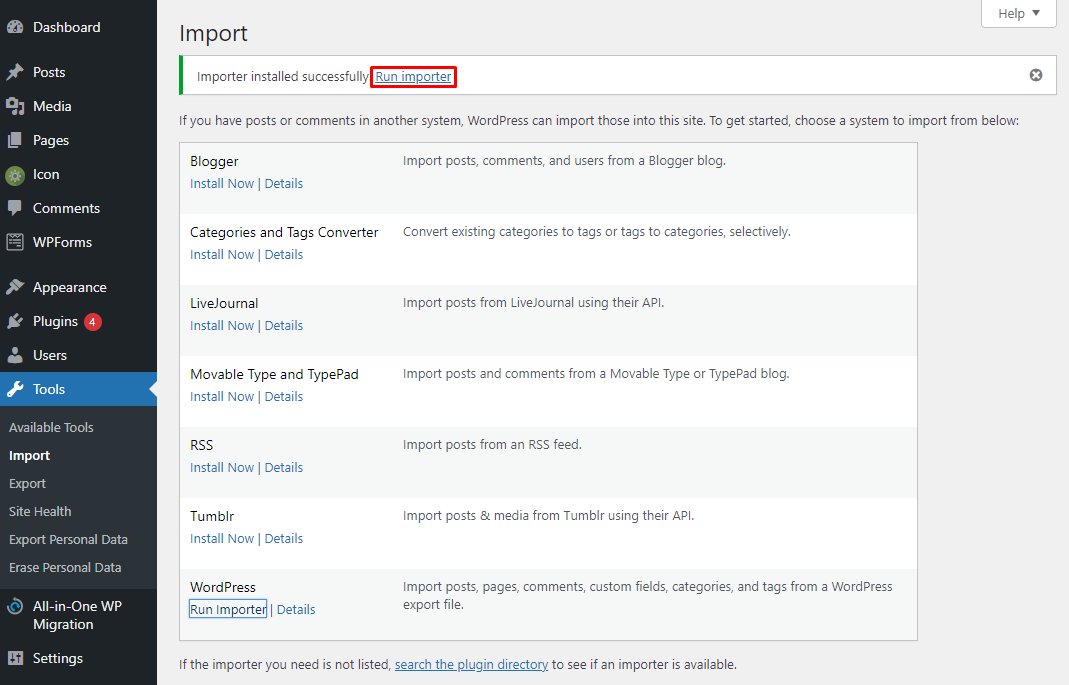
- After WordPress successfully installs the importer plugin, click on the Run importer button.
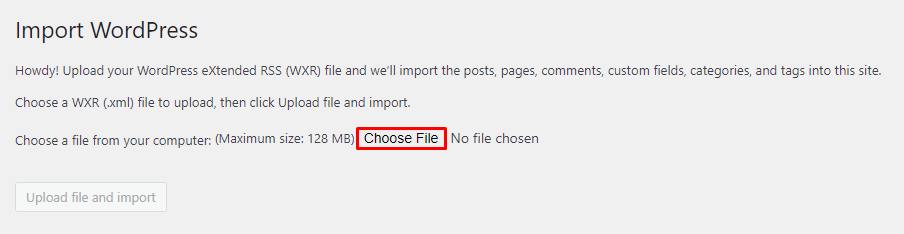
- Import your content by clicking on Choose File and uploading the exported file from WordPress.com. Click Upload file and import.
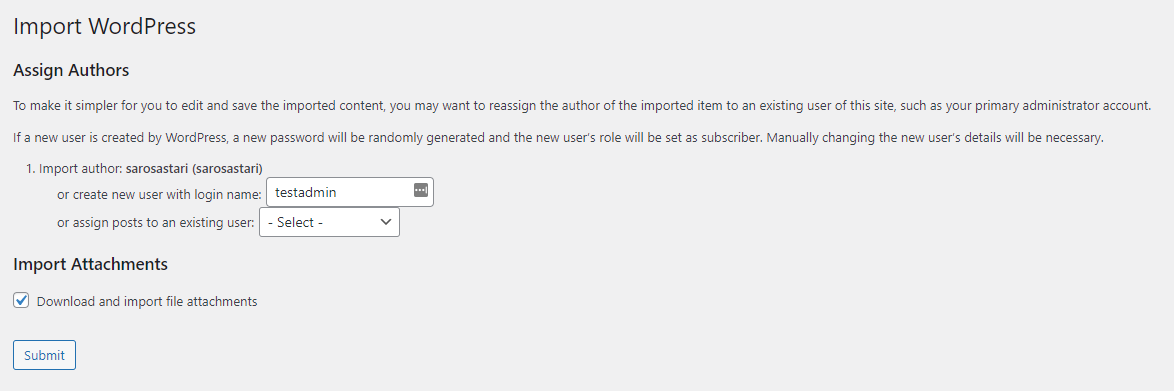
- You will be presented with a couple of options after you've uploaded and imported the file – to Assign Authors and Import Attachments. You can import authors from WordPress.com, create a new user with a new login name, or assign an existing user.
- Click on the Download and import file attachments to get all of the media files attached to your posts and pages. To finalize the WordPress importer process, click Submit.
- You will receive a message that will have a link to your website. It will show you whether the WordPress.com content has been imported successfully.
4. Import Image Files
WordPress will automatically import images from posts and pages if you've clicked on the Download and import file attachments button from the previous section.
There is also a way to re-upload the images if they're not present on any page or post. To do so, access the downloaded media files from the first step. This will show you a folder with the media files in it.
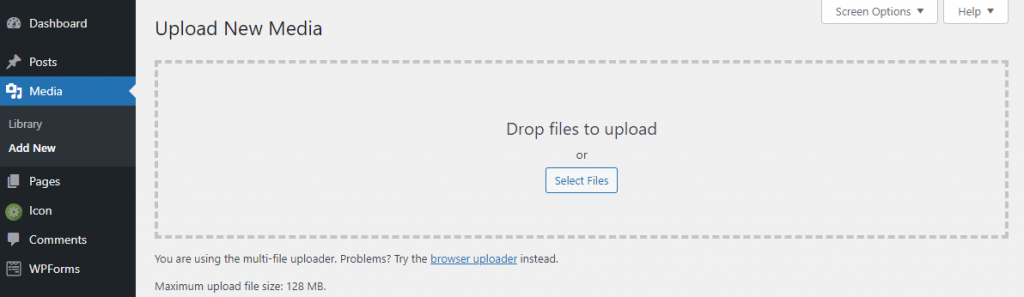
On your new self-hosted WordPress site, head to Dashboard -> Media -> Add New. Upload all the images and other media files you've downloaded from the WordPress.com site.
Another way to import images is by using the Auto Upload Images plugin. This plugin automatically uploads and imports external images to the WordPress media library.
NOTE: This plugin will only be helpful for missing image files.
If the previous image has a URL that starts with files.wordpress.com, it cannot be automatically converted to the new domain. Images with their URLs will lead visitors to the WordPress.com site instead.
5. Change URLs and Fix Permalinks
During the migration process, some of the URLs linked to posts or media files might not change and break URLs within the site. For example, when you write a post and add a link to another post, that link might still lead visitors back to your old WordPress.com website.
This problem might affect your website's SEO due to URLs being considered duplicates. Furthermore, the readers might be confused about which URL to use.
One way to fix this is to install the Better Search Replace plugin. Then, head to Dashboard -> Tools -> Better Search Replace. Under the Search/Replace section, add the two domain names you want to be interchanged.
Search for the previous domain name from WordPress.com, then replace it with the new site address. For the Select tables section, choose what you want to search for.
For example, to change the URLs in posts, choose wp_posts.
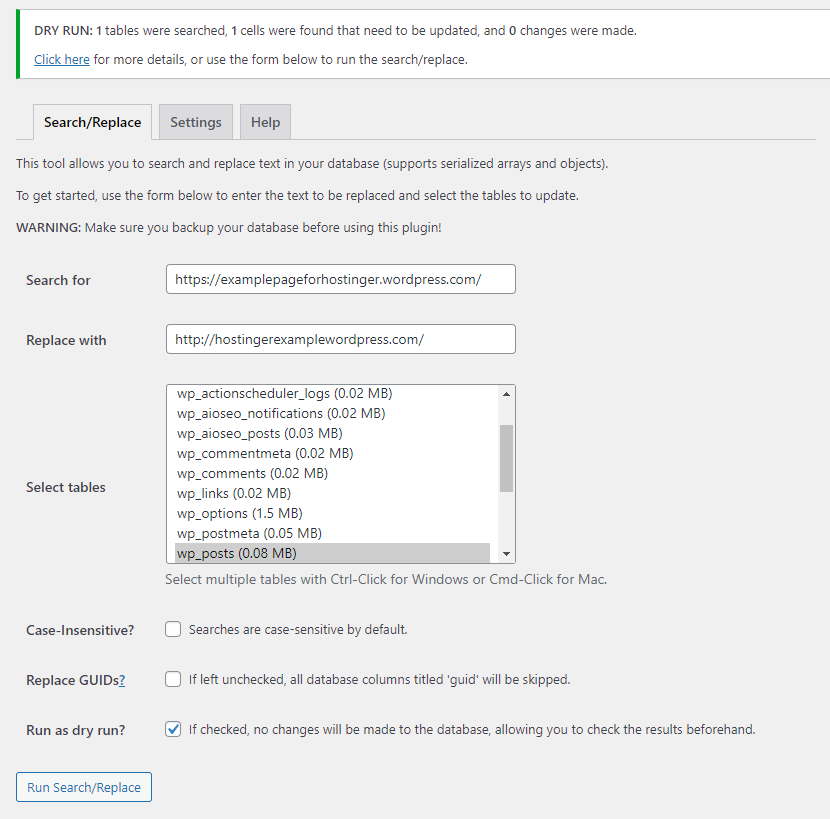
First, check the Run as dry run? box to see the details of how many potential changes the plugin found.
Uncheck the box and click Run Search/Replace again.
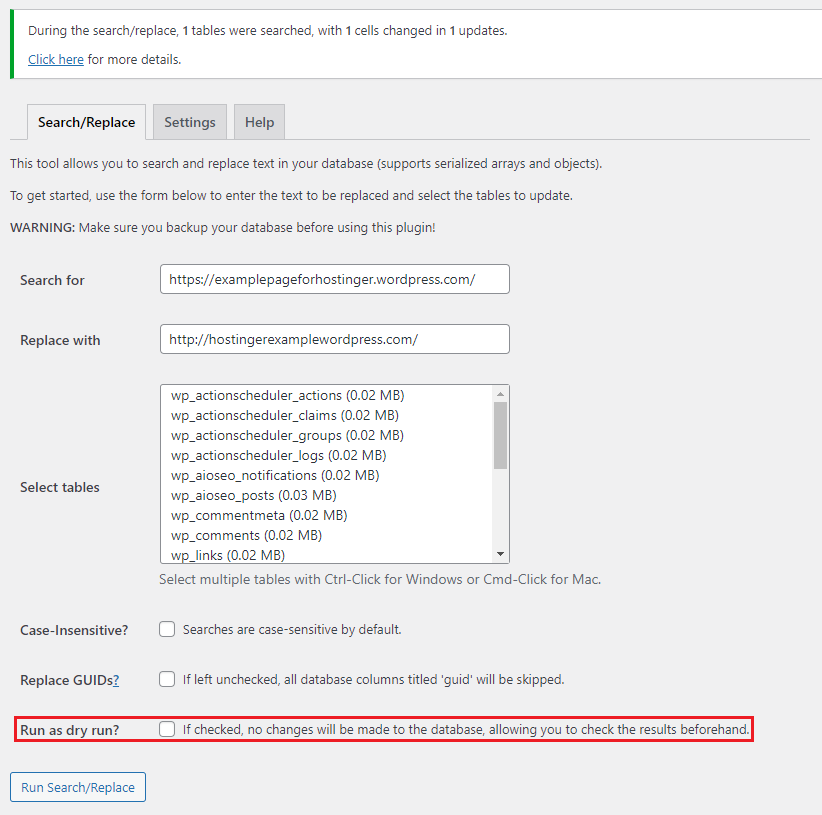
This setting will change all the old URLs from the WordPress.com site to the new WordPress.org site.
The permalinks on the self-hosted WordPress website should also use the same permalink structure as it was used in WordPress.com. By default, the permalink structure of WordPress.com sites is formatted as Day and name.
In WordPress.org, head to Dashboard -> Settings -> Permalinks, and click on Day and name under Common Settings. Then, click the Save Changes button.
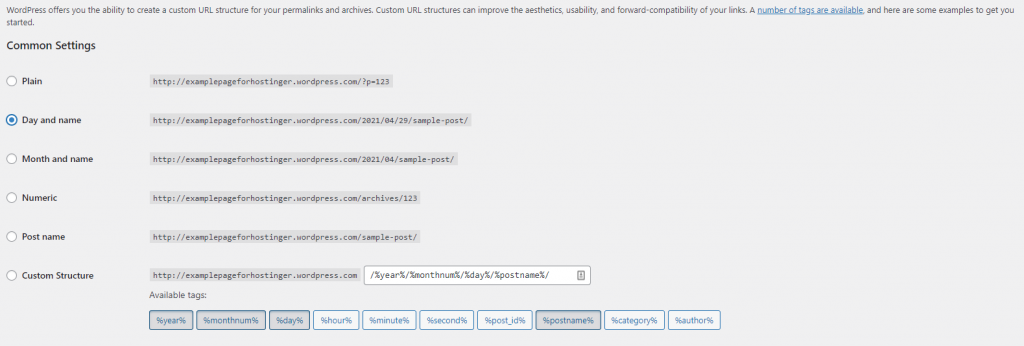
This setting will help change the URLs and fix permalinks in the blog and other content.
6. Redirect Visitors and Set the Blog to Private
Redirecting all visitors from the WordPress.com blog to the WordPress.org site will help keep your current search engine rankings and Site Redirect will help you with this.
To use this tool, head to the Dashboard of your WordPress.com site and click on Settings -> General. Under the Site address, you will find the Redirect this site option.
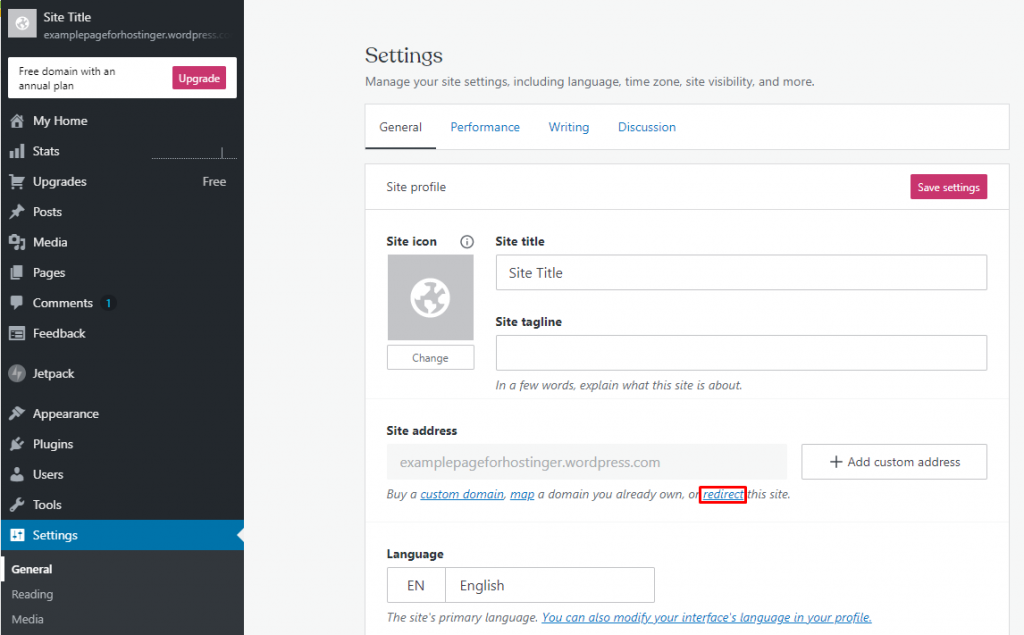
Here, you will find the Site Redirect tool, where you can add the new domain name. However, keep in mind that this tool costs $13/year.
Those who don't want to redirect their website can set their WordPress.com site to private instead. Head to General Settings -> Privacy and select Private. To finalize, click the Save settings button.

This option will make your WordPress.com website private. It will only be visible to you and those with login credentials that you have approved.
This option is excellent for smaller WordPress blogs and websites that don't want to invest in the Site Redirect tool. However, for more prominent blogs and sites that have more loyal readers, we recommend redirecting the domain instead.
Conclusion
By moving your website from WordPress.com to WordPress.org, you have the opportunity to increase your WordPress traffic further and grow your site through the use of the best WordPress plugins.
Here's a summary of how to migrate your website from one platform to the other:
- Export WordPress.com content. Export all content from WordPress.com, as well as download your media library.
- Set up the new WordPress.org. Different control panels are available, which offer various ways to install WordPress on your site. This will depend on the hosting provider you'll choose.
- Import content to the new site. Remember to import the media file along with your posts and pages.
- Import image files. If some images didn't get imported, there is an option to import your files manually instead.
- Change URLs and fix permalinks. Use the Better Search Replace plugin to change all the URLs from the old to the new domain.
- Redirect visitors and set to private. Lead your readers from the old site to the new one. Use the Site Redirect tool, or simply set WordPress.com to private.
Overall, migrating from WordPress.com to WordPress.org provides an excellent opportunity to grow your site and personalize it to your needs.
We hope that this tutorial has helped make the process easier. If you have any questions regarding this topic, feel free to leave a comment down below.

Astari is a Digital Content Writer at Hostinger, who is passionate about WordPress, digital marketing, and website builders. She enjoys sharing her knowledge through her writings. During her free time, Astari likes to try new activities, go on adventures, and learn about different cultures.
Switching From Wordpress Com To Wordpress Org
Source: https://www.hostinger.com/tutorials/moving-from-wordpress-com-to-wordpress-org
Posted by: quirogaughtmed.blogspot.com
0 Response to "Switching From Wordpress Com To Wordpress Org"
Post a Comment