

How To Remove Header Bar On Tumblr Blog
1. Installation
Ease theme installation in three steps.
- Make sure you are logged in to your tumblr account.
- Visit https://www.tumblr.com/theme/39042 and click on "Install" on top-right corner.
- Select your blog and click on "Install" again.
Mobile theme
If you would like to use Elise theme on mobile devices istead of default Tumblr theme, do this:
- Open "Edit theme" screen,
- Scroll to the bottom and select "Advanced options",
- Turn off "Use default mobile theme" option,
- Save and quit.
2. Configuration
A. Header section
Top part of the page contains top bar with your avatar image, blog title and top navigation menu, as well as header image with optional captions on it.
Top bar - Avatar and title
Your avatar and blog title are displayed here. Avatar can be changed with "Avatar" option. Then you can choose avatar shape, square or circle. Blog title can be changed with "Title" option.
Avatar and/or title can be hidden. With "Show title" option you can disable showing of title and "Show avatar" disables avatar image.
Header image
Upload header image by using "Header image" option and set height with "Header height" (220px, 300px or 380px). Now is time to add text captions.
Inside header image you can place up to three text captions. Each one can have different font size, text style and align. If text is hard to read you can change "Header mask opacity" and "Header mask color". Mask opacity range from 0 (invisible) to 1 (no transparent).
Use "Title font" and "Title color" to customize your captions.
Adding captions example.
1. I typed in "Welcome to" to "Caption 1 text" and set "Caption 1 font size" to 24px. I left "Caption 1 style" as normal and "Caption 1 align" set to centered.

2. To move text downward I set "Caption 1 top margin" to 25px. Next, added "ESTEN THEME" as second caption "Caption 2 text". I wanted this text to be bigger so i set "Caption 2 font size" to 40px. Also, I changed "Caption 2 style" to border medium. Finaly, to make free space between first and second caption, I set "Caption 2 top margin" to 30px.

3. I typed in text to "Caption 3 text" set font size, changed "Caption 3 style" to italic. And then I set "Caption 3 top margin" to 30px for my last caption.

B. Posts section
In post section you can customize 'about me' post, posts header style, posts header color and tags style.
About me post

This 'about me' post is always displayed first on index page. It can contain one image, text description (this text can use HTML tags) and navigation menu.
Use "About blog image" option to upload your picture and "Description" for insert text. Description can contain HTML tags, for example:
<b>Text</b> - display word 'Text' with bold font,
<i>Text</i> - display word 'Text' with italic font,
<br> - break line, text after this tag will be moved to next line.
Navigation section contain four icons (Home, RSS, Random, Archive) and link to custom pages, if there is any as well as 'contact' page and 'submit' page, if enabled in the tumblr settings.
More about adding custom pages you can find in official tumblr documentation: https://www.tumblr.com/docs/en/pages.
Posts headers

Use "Posts header style" option to change headers look. Currently there are 3 styles to choose from.
"Accent color" allows you to change color of the posts headers.
If you select first or second header style, there are visible counters for post notes and comments (disqus feature must be enabled). You can turn on and off one of this counters or both.
To do so use "Show post notes count" and "Show post comments count".
Tags style

You can choose how tags will look in your posts. You can change their appearance with "Tags style" option.
There is also "Show tags on index page" option, allowing you to show or hide tags from index page (pages where many posts all displayed in grid layout). If you disable this option tags will not be shown on the index page but still will be visible on single post page.
C. Footer section
Footer section contains widgets. All widgets are optional. There is Twitter feed, Flickr feed, Dribbble feed, tags cloud, social links, custom text and search box.
Twitter feed
You can enable Twitter feed by integrating your Twitter account in Tumblr settings.
- open your Tumblr dashboard page,
- enter 'Settings' by using top menu,
- select blog from the right side menu,
- scroll down till you see "Twitter" section, click on "Share on twitter" button,
- authorize Tumblr to access you twitter account,
- (optional) disable "Share posts on your Twitter" if you don't want your Tumblr posts to be automatically shared to your Twitter.
Now you can change widget label displayed above your tweets as well as how many tweets you want to load.

Flickr feed
To enable flickr feed you need to type in your flickr id/username to "Flick ID" box. Then you can change widget label displayed above your flickr feed as well as how many pictures you want to load.

Instagram feed
To enable Instagram feed you need to type in your valid Instagram access token to "Instagram access token" option. Then you can change widget label displayed above your Instagram feed as well as how many pictures you want to load.
Tag cloud
You can enable/disable this widget with this option.

This widget allows visitors of your blog to quick access to the tagged group of posts. When you are make new post or reblog from others you can add tags to your post. And then you can add this tag name to the tags cloud.

"Categories label" is displayed inside top navigation and "Categories label 2" above tags cloud in page footer. "Category x tag" is where you type tag name you want to add to tags cloud. There is a place for 10 tags.
Social links
This widget contains icons with links to your social networks (Facebook, Google+, Twitter, Dribbble, Instagram, Flickr, YouTube, Vimeo, DeviantART, Pinterest, LinkedIn, Behance, GitHub, Spotify, SoundCloud).
You can enable/disable this widget with this option.

There is option to enter web addresses of your profiles at corresponding social network. If you leave these blank, icon will not be shown.

Custom text
This widget allows you to place text inside footer section. You can also use HTML tags here, such as <b> <i> <strong> <em> <a> and other to customize your message.
You can enable/disable it by this option:

Widget title and content can be added using this options.

D. Other options
Disqus comments
To add disqus comments to your blog you first must register to Disqus site at https://disqus.com/. After registration you will have disqus shortname.
Type in this name to "Disqus shortname" field in theme options and you are done.
If you want to see comments counter on your posts headers, first go to your disqus account and in settings window you must change how comments number are displayed. Change "0 comments" to "0", "1 comment" to "1" and " comments" to "", like so:

Remeber to save your changes. Now you can enable "Show post comments count" in Esten theme options.
Google Analytics
"Google Analytics is a simple, easy-to-use tool that helps website owners measure how users interact with website content." If you want to use this feature type your ID to "Google analytics ID" in theme options.
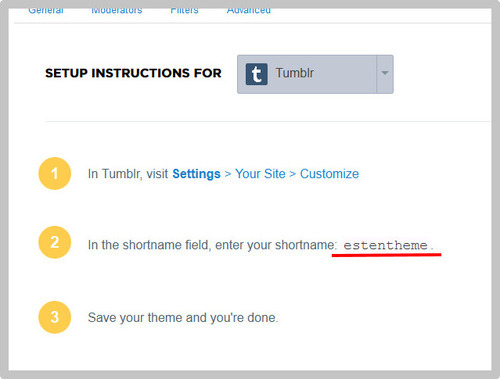
Google Fonts
You can use font from Google webfont service http://www.google.com/fonts/#.
WARNING: Not all fonts will work without issues. Fancy ones, can be hard to read or text may overlap from one element to another.
1. Find font you like to use and click on "Quick-use" button.

2. Select Normal 400, Normal 400 Italic, Bold 700 and Bold 700 Italic if these options are avaliable.

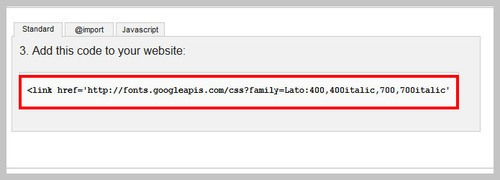
3. Scroll down and copy code in the box, than paste it to "Google Fonts CODE for title" or "Google Fonts CODE for text" in theme options.
4. Look for the font name, than type it in the "Google Fonts NAME for title" or "Google Fonts NAME for text" field in theme options.

3. FAQ
- None, so far…
4. Credits
A big thanks to those who let me use their scripts and other resources for my theme.
- Masonry - http://masonry.desandro.com/
- Google WebFont - http://www.google.com/fonts/#
- jQuery - http://jquery.com/
- IcoMoon App - http://icomoon.io/
- Disqus - http://disqus.com
- Photoset Grid - http://stylehatch.github.com/photoset-grid/
- Nivo Lightbox jQuery - http://dev7studios.com/plugins/nivo-lightbox/
- HTML5 Shiv - http://code.google.com/p/html5shiv/
- Livestamp.js - http://mattbradley.github.io/livestampjs/
5. Changelog
Version 1.2h - 16 July 2016
- ADDED - new Instagram feed script
- CHANNGE - pictures in text post can be opened in lightbox view
Version 1.2g - 6 December 2015
- FIXED - top manu overlaping Tumblr controls menu
- FIXED - added missing categories (from 11 to 15) to the top menu
- FIXED - fixed sharing codes
Version 1.2f - 15 September 2015
- ADDDED - new post header style without icons
- FIXED - footer social feeds overlaping other widgets
Version 1.2e - 13 September 2015
- FIXED - videos in all aspect ratios should now be displayed correctly
Version 1.2d - 4 September 2015
- FIXED - lightbox for photosets no longer opens pictures from other photosets
- FIXED - videos and other embeds inside text post or capton have proper height now
- CHANGE - Google Analytics code moved to document head section
Version 1.2c - 9 July 2015
- ADDED - more font options
- ADDED - option for single page width
- CHANGE - Tumblr fonts are now used as default fonts
- CHANGE - new easier way to use Google Fonts
Version 1.2b - 1 May 2015
- REMOVED - fitVids script which was making conflicts with Vimeo API
- FIXED - Vimeo videos thumbnail bug when browser back button is used
- FIXED - footer paddings if only Instagram feed is ON
Version 1.2a - 14 April 2015
- ADDED - social icons in about me post
- ADDED - separete options for footer link color and buttons color
- ADDED - open posts and open social links in new tab option added
- REMOVED - home, RSS, random and archive icons from about me post
- FIXED - inline content width fixed
- CHANGE - new look for tweeter feed
Version 1.2 - 21 March 2015
- ADDED - multiple header images
- ADDED - new header full width style
- ADDED - instagram feed
- ADDED - second foorer text widget
- ADDED - 5 background patterns
- ADDED - color options for tags
Version 1.1b - 10 January 2015
- FIXED - loading wrong posts on tag pages after clicking on "Load more posts"
- FIXED - picture open in lightbox not in center
- FIXED - panorama posts missing bottom margin
- FIXED - footer widgets margins
Version 1.1a - 6 January 2015
- FIXED - wrong links for theme .css an .js files
Version 1.1 - 6 January 2015
- ADDED - following blog widget
- ADDED - Nivo lightbox for photo and photoset posts
- ADDED - Timestamps for twitter widget
- ADDED - option for changing body font
- ADDED - color options
- CHANGE - overall visual changes
Version 1.02 - 26 September 2014
- FIXED - tumblr hosted videos width,
- FIXED - top bar height if title is disabled,
- FIXED - corrected line hight for question in answer posts and in top message text,
- FIXED - iframe width inside posts caption,
- FIXED - few minor bugs in html code,
- CHANGE - replaced photoset plugin with default tumblr photosets.
Version 1.0 - 30 June 2014
- Initial release.
How To Remove Header Bar On Tumblr Blog
Source: https://esten-theme.tumblr.com/documentation
Posted by: quirogaughtmed.blogspot.com
0 Response to "How To Remove Header Bar On Tumblr Blog"
Post a Comment